NetApp Snapdrive for SQL

Here’s a quick post about an Issue I’ve just had. Suddenly Snapdrive for SQL stopped working and was reporting this in the logs.

[11:35:05.303] [SQLSERVER] *** SnapManager for SQL Server Report

[11:35:05.303] [SQLSERVER] Getting SQL Server Database Information, please wait… [11:35:05.303] [SQLSERVER] Creating thread for enumerating all databases from all nodes… [11:35:05.303] [SQLSERVER] Waiting for the threads to finish enum all databases… [11:35:05.304] [SQLSERVER] Get database and LUN information… [11:35:05.304] [SQLSERVER] Getting virtual disks information…

[11:35:05.304] [SQLSERVER] Starting SDAPI storage enumeration… [11:35:08.331] [SQLSERVER] Querying SQL Server instances installed… [11:35:08.334] [SQLSERVER] Creating threads for enumerating databases of different SQL Server instances. [11:35:08.334] [SQLSERVER] Waiting for the threads to finish enumerating databases. [11:35:09.251] [SQLSERVER] [SMO] Connecting to SQL Server instance - SQLSERVER… [11:35:09.252] [SQLSERVER] [SMO] Querying database information… [11:35:10.386] [SQLSERVER] All threads finished enumerating databases. [11:35:10.387] [SQLSERVER] Validating database configuration… [11:35:10.387] [SQLSERVER] Setting database disk configuration… [11:35:10.387] [SQLSERVER] Setting database locating on SQLRoot path… [11:35:10.388] [SQLSERVER] Querying database disk volume configuration… [11:35:10.388] [SQLSERVER] Getting SnapInfo directories configuration…

[11:35:10.390] [SQLSERVER] Checking dataset availability, connecting to SnapDrive… [11:35:10.831] [SQLSERVER] Dataset feature is currently unavailable. [11:35:10.831] [SQLSERVER] Getting SnapManager dataset info from… [11:35:10.831] [SQLSERVER] Dataset info file has not yet created. [11:35:10.833] [SQLSERVER] Database requested has not been configured for backup. This database is marked as:Database file is on unsupported volume, possibly local disk.. Server:SQLSERVER Database:DATABASE. This Database will be skipped. [11:35:10.833] [SQLSERVER] Error Code: 0xc0040900 Unable to find any valid databases to be backed up.

[11:35:10.834] [SQLSERVER] Preparing for sending filer AutoSupport… [11:35:10.834] [SQLSERVER] [11:35:10.834] [SQLSERVER] [11:35:10.834] [SQLSERVER]

After lots of digging I noticed in the filer audit.log there was no entries for the login. This go me thinking… Can the SQL server see the filer? Answer was no, I attempted to resolve the filer’s name from the SQL server and it wouldn’t resolve.

I checked DNS and it had lost the filer’s dns record.

I put it back in and it’s all working now.

Please note that the above error also happens if the credentials are incorrect.

**Snapdrive password for filer must be =< 14 Character otherwise SnapDrive truncates it to 14 Chars.

[Read More]

Cisco ASA

Here’s a few bits for a Cisco ASA to allow Windows Domain Services.

e.g. you need a DMZ server to be a member server of a domain on the internal LAN.

object-group service Windows_KDC
 description Windows KDC
 service-object tcp-udp eq 88
 service-object tcp-udp eq 464
 service-object udp eq 389
object-group service Windows_LSASS
 description Windows LSASS
 service-object tcp eq 3268
 service-object tcp eq 3269
 service-object tcp-udp eq 389
 service-object tcp eq ldaps
 service-object tcp eq 135
 service-object udp eq ntp
object-group service Windows_DNS
 description Windows DNS
 service-object tcp-udp eq domain
object-group service Windows_Browser
 description Windows Browser
 service-object udp eq netbios-ns
 service-object udp eq netbios-dgm
 service-object tcp eq netbios-ssn
object-group service Windows_DCE-RPC
 description Windows DCE-RPC
 service-object tcp eq 1026
 service-object tcp eq 1025
object-group service Windows_Dfs
 description Windows Dfs
 service-object udp eq netbios-dgm
 service-object tcp eq netbios-ssn
 service-object tcp-udp eq 389
 service-object tcp eq 445
 service-object tcp eq 135
object-group service Windows_Domain_Services
 description Windows Domain services
 group-object Windows_Browser
 group-object Windows_LSASS
 group-object Windows_DNS
 group-object Windows_KDC
 group-object Windows_DCE-RPC
 group-object Windows_Dfs
[Read More]
Tags: old blog Cisco

NetApp / IBM N-Series - Replacing all disks in an active/active dual controller system where all disks belong to aggregates.

Problem

Need to replace all the disks in your NetApp FAS or IBM N-Series Storage System?

This explains how to deal with a common disk replacement scenario that occurs within SMEs running entry-level dual controller NetApp FAS or IBM N-Series storage systems, where the controllers are running in an active/active configuration with each controller owning one aggregate.

Scenario

The Customer has two NetApp FAS or IBM N-series ONTAP 7-mode 7.x or 8.x Storage Systems on their network. One is used for production and one for backups/archiving.

The Customer wants to replace all of the disks in the production storage system.

The Storage System we are working with is a 2-controller system. In this example, the controllers are called CONTROLLER1 and CONTROLLER2.

CONTROLLER1 owns 12 disks in tray 1 (Internal SATA/SAS Tray) CONTROLLER2 owns 14 disks in tray 2 (External FC/SAS Tray)

The disks we want to replace are the 12 disks in tray1 owned by CONTROLLER1

There are no unallocated or unowned disks in tray 2. All disks are 100% allocated to their controller’s respective Aggregates (aggr0 for CONTROLLER1, aggr1 for CONTROLLER2). Both aggregates are RAID-DP and each has a single online spare.

All production volumes on CONTROLLER1 have already been backed up and migrated elsewhere. All that remains on aggr0 is the root volume for CONTROLLER1, which we call vol0 in this example.

Removing the disks from tray1 will destroy root volume vol0 for CONTROLLER1, rendering the controller unbootable, therefore forcing a time consuming rebuild of the controller’s configuration.

Procedure

This procedure avoids this undesirable consequence and provides for a very fast route to the desired upgrade with a minimum of risk.

The migration takes place in 4 steps:

  • Backing up volumes to another NetApp/IBM N series storage system
  • Freeing up and reassigning disks
  • Copying the root volume and forcing boot from the copy.
  • Replacing the disks
  • Assigning the new disks
  • Copying the root volume to the new disks and forcing boot from the copy
  • Tidy-up

Backing up volumes This assumes you have another IBM N-Series or NetApp 7.x or 8.x 7-mode storage system on the network with spare capacity to take a backup of all of the data on the Storage system being upgraded. If you have a D2D or D2T backup system that can take block level backups of NetApp volumes (such as Snapvault) then this solution could be used instead of the method described in this section.

The controller host name of the second storage system we are using for backup purposes is SYSTEM2 in this exercise.

  1. On SYSTEM2 create volumes identical in name, size and configuration to those on CONTROLLER2: CONTROLLER2> vol create g CONTROLLER2> snap reserve 0

  2. Repeat step 1 for all volumes on CONTROLLER2
  3. Create a user on CONTROLLER2 called ndmpuser
  4. Create a user on SYSTEM2 called ndmpuser
  5. On CONTROLLER2 run commands:
CONTROLLER2> ndmpd on

(This turns on “ndmp” volume to volume block copy functionality)

CONTROLLER2> ndmpd password ndmpuser

This will return a response similar to this: password g8x8xxxxxmZ0121

  1. On SYSTEM2 run commands:
SYSTEM2> ndmpd on
SYSTEM2> ndmpd password ndmpuser

This will return a response similar to this: password 48so8xxxxxxZ00nA

  1. On CONTROLLER2 run command:
CONTROLLER2> ndmpdcopy –sa ndmpuser: –da ndmpuser: "CONTROLLER2:/vol/" "SYSTEM2: :/vol/"
  1. Wait for the NDMPCOPY block level backup to complete

  2. Repeat steps 7 and 8 for all volumes on CONTROLLER2

  3. The backup of all production volumes on the Storage system is now complete. Your data is now safe

Freeing up and reassigning disks

This is the “clever” bit. We actually have two disks on CONTROLLER2’s aggregate that we can use to temporarily host CONTROLLER1’s root volume vol0. Where? One is the online spare and the other is the second parity disk. We just need to persuade CONTROLLER2 to give them up.

Obviously the production data on CONTROLLER2’s aggregate is at risk in this procedure – one slip of the fingers, or a disk hardware failure while carrying out this procedure could wipe out the whole aggregate and everything on it. This is why we backed up all the volumes first!

  1. First, we change the aggregate on CONTROLLER2 from RAID-DP to RAID4. This frees up the disk we need.
CONTROLLER2> aggr options  raidtype raid4
  1. Now we take a look at the Disk Ids for all 12 disks on CONTROLLER2
CONTROLLER2> disk show

This returns a list similar to this:

DISK             OWNER
0c.00.10     CONTROLLER1(142242188)   Pool0  WD-WCAW11111111
0c.00.11     CONTROLLER1(142242188)   Pool0  WD-WCAW11111111
0c.00.7      CONTROLLER1(142242188)   Pool0  WD-WCAW11111111
0c.00.6      CONTROLLER1(142242188)   Pool0  WD-WCAW11111111
0c.00.9      CONTROLLER1(142242188)   Pool0  WD-WCAW11111111
0c.00.1      CONTROLLER1(142242188)   Pool0  WD-WCAW11111111
0c.00.2      CONTROLLER1(142242188)   Pool0  WD-WCAW11111111
0c.00.4      CONTROLLER1(142242188)   Pool0  WD-WCAW11111111
0c.00.3      CONTROLLER1(142242188)   Pool0  WD-WCAW11111111
0c.00.5      CONTROLLER1(142242188)   Pool0  WD-WCAW11111111
0c.00.8      CONTROLLER1(142242188)   Pool0  WD-WCAW11111111
0b.16        CONTROLLER2(142242248)   Pool0  aaaaaaaa
0b.26        CONTROLLER2(142242248)   Pool0  aaaaaaaa
0b.25        CONTROLLER2(142242248)   Pool0  aaaaaaaa
0b.27        CONTROLLER2(142242248)   Pool0  aaaaaaaa
0b.29        CONTROLLER2(142242248)   Pool0  aaaaaaaa
0b.18        CONTROLLER2(142242248)   Pool0  aaaaaaaa
0b.17        CONTROLLER2(142242248)   Pool0  aaaaaaaa
0b.20        CONTROLLER2(142242248)   Pool0  aaaaaaaa
0b.21        CONTROLLER2(142242248)   Pool0  aaaaaaaa
0b.23        CONTROLLER2(142242248)   Pool0  aaaaaaaa
0b.22        CONTROLLER2(142242248)   Pool0  aaaaaaaa
0b.28        CONTROLLER2(142242248)   Pool0  aaaaaaaa
0b.19        CONTROLLER2(142242248)   Pool0  aaaaaaaa
0b.24        CONTROLLER2(142242248)   Pool0  aaaaaaaa
0c.00.0      CONTROLLER1(142242188)   Pool0  WD-WCAW11111111
  1. Find out which two of CONTROLLER2’s disks are the spares (one being the original spare and the second being the parity disk we liberated by converting the aggregate to RAID4 earlier. The spares can be viewed under CONTROLLER2 - Storage - Disks in NetApp System Manager. They will have a “State” of “Spare”.

In this case, let’s say the Spare disks are: 0b.16 0b.29

  1. First we turn disk Autoassign off: on CONTROLLER2:
CONTROLLER2> options disk.auto_assign off

on CONTROLLER1:

CONTROLLER1> options disk.auto_assign off
  1. We now need to remove the owner from these two disks: From CONTROLLER2:

``shell CONTROLLER2> disk assign 0b.16 –s unowned –f CONTROLLER2> disk assign 0b.29 –s unowned –f


substituting 0b.16 and 0b.29 with your spare disk Ids

You will get a warning about there not being enough spare disks.  Ignore this for now.

6. Next, we assign our two newly liberated disks to CONTROLLER1.
From CONTROLLER1:

```shell
CONTROLLER1> disk show –n

This will show the two unassigned disks something like this:

DISK       OWNER                  POOL   SERIAL NUMBER
0b.16      Not Owned              NONE   AAAAAAAA
0b.29      Not Owned              NONE   AAAAAAAA
  1. Now we assign the two disks to CONTROLLER1:
CONTROLLER1> disk assign 0b.16 –o CONTROLLER1
CONTROLLER1> disk assign 0b.29 –o CONTROLLER1

Again, substituting 0b.16 and 0b.29 with the same disk Ids you worked with in step 5

  1. If we execute a DISK SHOW command now, we should see that CONTROLLER1 now owns the two liberated disks (0b.16 and 0b.29 in this example)

  2. No we can create an aggregate called “aggr_temp” on the two new disks to take the temporary root volume while we swap out CONTROLLER1’s disks:

CONTROLLER1> aggr create aggr_temp -f -t raid4 -d 0b.16 0b.29

again use your own disk IDs per steps 6 & 7

  1. Run command AGGR STATUS and watch the status of aggr_temp. As soon as it goes to status “Online” you may proceed to the next step. This process could take several minutes or several hours depending on the speed and size of your disks and other load on the storage system.

  2. Now we create a new volume on the new aggregate aggr_temp called vol0_temp of identical size and configuration as CONTROLLER1’s root volume

CONTROLLER1> vol create vol0_temp aggr_temp 12g
CONTROLLER1> snap reserve vol0_temp 0

Copying the root volume and making it bootable

  1. We are now ready to copy our root volume. We need to elevate our access level for these commands:
CONTROLLER1> priv set diag
  1. Now we do a block level copy of the root vol:
CONTROLLER1*> ndmpd on
CONTROLLER1*> ndmpcopy "/vol/" /vol/vol0_temp
  1. Once copy is complete, we tag the copy root volume on the tray 2 disks as the root volume for the controller, then restart the controller.
CONTROLLER1*> vol options vol0_temp root
CONTROLLER1*> reboot –t 0
  1. Wait for CONTROLLER1 to reboot, then log back into it.

  2. You may now offline and destroy the original root volume and original production aggregate (the one containing the original root volume).

From CONTROLLER1 run commands:

CONTROLLER1*> vol offline
CONTROLLER1*> vol destroy
CONTROLLER1*> aggr offline
CONTROLLER1*> aggr destroy
  1. We can then remove CONTROLLER1 as the owner of the 12 disks that we are replacing.

Use the DISK SHOW command to get the list of 12 Disk Ids, then run a:

disk remove_ownership

command for each disk

Replacing the disks

The Disks connected to CONTROLLER1 may now be physically replaced with the newer items.

Assigning the new disks

We can now assign the new disks to CONTROLLER1.

  1. From CONTROLLER1, execute command:
CONTROLLER1> disk show –n

You will see the 12 new disks listed in a manner similar to that shown below:

DISK       OWNER                  POOL   SERIAL NUMBER
0c.00.6    Not Owned              NONE   11111111111111111111
0c.00.10   Not Owned              NONE   11111111111111111111
0c.00.2    Not Owned              NONE   11111111111111111111
0c.00.7    Not Owned              NONE   11111111111111111111
0c.00.11   Not Owned              NONE   11111111111111111111
0c.00.9    Not Owned              NONE   11111111111111111111
0c.00.5    Not Owned              NONE   11111111111111111111
0c.00.8    Not Owned              NONE   11111111111111111111
0c.00.1    Not Owned              NONE   11111111111111111111
0c.00.4    Not Owned              NONE   11111111111111111111
0c.00.0    Not Owned              NONE   11111111111111111111
0c.00.3    Not Owned              NONE   11111111111111111111
  1. Now we assign each of the new disks in turn to CONTROLLER1 using command:
CONTROLLER1&gt; disk assign  -o CONTROLLER1

i.e.

disk assign 0c.00.6 -o CONTROLLER1
disk assign 0c.00.10 -o CONTROLLER1

until you have assigned all 12 disks.

  1. We can now create our new aggregates using the “aggr create” command. The setup of these is obviously up to you. Remember to leave one spare though!

For the purposes of this example, we assume the new aggregate on which the root volume for CONTROLLER1 will be placed is called aggr0.

  1. Next create your new root volume on the new disks:
CONTROLLER1> vol create vol0 aggr0 12g

Creates a 12GB volume called vol0 on aggregate aggr0. If you prefer another size, use this instead.

  1. Now we can copy the root volume back to its proper location on the new disks:
CONTROLLER1*> ndmpd on
CONTROLLER1*> ndmpcopy /vol/vol0_temp /vol/vol0

You should substitute vol0 for your chosen volume name if different to the above. But the TEMP vol0 should always go FIRST and the root volume on the new disks SECOND.

  1. Once copy is complete, we tag the copy root volume on the tray 2 disks as the root volume for the controller, then restart the controller.
CONTROLLER1*> vol options vol0 root
CONTROLLER1*> reboot –t 0
  1. Wait for CONTROLLER1 to reboot

Tidy-up

  1. On CONTROLLER1, run these commands to remove the old temp root volume:
CONTROLLER1> Vol offline vol0_temp
CONTROLLER1> Vol destroy vol0_temp

with “Y” to acknowledge

  1. On CONTROLLER1, run these commands to remove the old temp root aggregate:
CONTROLLER1> Aggr offline aggr_temp
CONTROLLER1> Vol destroy aggr_temp

with “Y” to acknowledge

  1. On CONTROLLER1, de-assign the two disks we “borrowed” from CONTROLLER2:
CONTROLLER1> options disk.auto_assign off
CONTROLLER1> disk assign  –s unowned –f

These will be the same two disk IDs you worked with in “Freeing up disks” step 5

  1. You are now done with CONTROLLER1. You will switch to CONTROLLER2 for the remainder of the procedure. First, we assign the two “borrowed” disks back to CONTROLLER2
CONTROLLER2> disk assign  -o CONTROLLER2
  1. Then, to wrap up we convert CONTROLLER2’s aggregate back to RAID_DP:
CONTROLLER2> aggr options  raidtype raid_dp

All done! Of course, if we want to replace CONTROLLER2’s disks as well, we simply migrate all of CONTROLLER2’s production volumes over to CONTROLLER1 and repeat the procedure above, except that this time, we transpose CONTROLLER1 and CONTROLLER2.

[Read More]

PowerCLI Remove not connected LUN's

Quick post, will update later

#################################################
# Add Vmware Powercli snapin
If ((Get-PSSnapin "VMware.VimAutomation.Core" -ErrorAction SilentlyContinue) -eq $null) {
Add-PSSnapin "VMware.VimAutomation.Core"
}
#################################################
# Set Powercli Certification policy
Set-powercliconfiguration -InvalidCertificateAction Ignore -Confirm:$false | out-null
#################################################
#Connect to VIserver
$VIserver="MATTVISERVER"
Write-host "Connecting to $VIServer"
$server = Connect-VIServer -Server $VIServer -Protocol https
#################################################
# ESX Host
$vmhost="MATTESXHOST"
#################################################
# Connect to esxcli for $vmhost
$esxcli=get-esxcli -vmhost $vmhost
# List storage devices that are status not connected
$detached=$esxcli.storage.core.device.List() | where {$_.Status -eq "not connected" -and $_.Vendor -eq "NETAPP"}
Foreach ($lun in $detached) {
$device_id=$lun.Device
# Force device to be administratively offline
$esxcli.storage.core.device.set($device_id,"IsOffline",$null,"off")
# Force device to be administratively online
$esxcli.storage.core.device.set($device_id,"IsOffline",$null,"on")
# Rescan All HBA's
Get-VMHostStorage -VMHost $vmhost -RescanAllHBA
}
[Read More]

PowerCLI Remove Detached LUN's

Here is a quick draft post, will update later.

#################################################
# Add Vmware Powercli snapin
If ((Get-PSSnapin "VMware.VimAutomation.Core" -ErrorAction SilentlyContinue) -eq $null) {
Add-PSSnapin "VMware.VimAutomation.Core"
}
#################################################
# Set Powercli Certification policy
Set-powercliconfiguration -InvalidCertificateAction Ignore -Confirm:$false | out-null
#################################################
#Connect to VIserver
$VIserver="MATTVISERVER"
Write-host "Connecting to $VIServer"
$server = Connect-VIServer -Server $VIServer -Protocol https
#################################################
$counter = 0    # Initialize counter for progress bar
$hosts=get-vmhost
Foreach ($esxhost in $hosts)
{
$esxhostname=$esxhost.Name
Write-Progress -Activity "Connecting to ESX Host" -Status "Connecting to $esxhostname" -PercentComplete (100*($counter/$hosts.count))
$esxcli=get-esxcli -vmhost $esxhostname -ErrorAction SilentlyContinue
$detachedcounter=0
# Get storage devices that have status of off e.g. Offline/Dead
$detached=$esxcli.storage.core.device.List() | where {$_.Status -eq "off"}
IF ($detached -ne $null)
{
foreach ($device in $detached)
{
$deviceID=($device).Device
Write-Progress -Activity "Checking for Detached LUN's on $esxhostname" -Status "Checking $deviceID" -PercentComplete (50*($detachedcounter/$detached.count))
Start-sleep -s 2
$IsDetached=$null
#Check to ensure offline device is detached if so run loop
$IsDetached=$esxcli.storage.core.device.Detached.List($deviceID)
IF ($IsDetached -ne $null) {
Write-Progress -Activity "Removing Detached LUN's on $esxhostname" -Status "Removing $deviceID" -PercentComplete (100*($detachedcounter/$detached.count))
Start-sleep -s 2
Write-Host "Removing Detached LUN $deviceID from $esxhostname"
# Remove Detached device
$esxcli.storage.core.device.Detached.Remove($deviceID)
}
$detachedcounter++
}
Write-Progress -Activity "Rescanning Storage on $esxhostname" -Status "Rescanning..." -PercentComplete (150*($counter/$hosts.count))
# Rescan All HBA's on server, this is essential as the VI Client misreports the data until this has been done.
Get-VMHostStorage -VMHost $esxhostname -RescanAllHBA
Start-sleep -s 1
}
$esxhostname=$null
$counter++
}
[Read More]

Salter 508 ORSSCR Battery change

Overview

Battery replacement for a Salter Gourmet Digital Meat Thermometer Model: 508 ORSSCR

Instructions

Below are the instructions to replace the battery in Salter Gourmet Digital Meat Thermometer Model: 508 ORSSCR 508ORSSCR

To replace the battery you need

  • Small phillips head screwdriver (PZ1)
  • Small flat head screwdriver (4 or 5mm).

You can get these from Maplins, Radio Shack etc.

  • CR2032 battery. Buy a couple because they do not last very long.

Steps

  1. Remove the two silicone “bungs” on either side of the unit.
  2. Remove the sensor cover (the spike cover).
  3. Remove the flat piece of silicone at the base of the spike.
  4. VERY IMPORTANT - REPLACE THE SENSOR COVER!
  5. One of the holes at the base of the spike is larger than the others. Look inside (put your specs on) and you will see a small screw. Undo the screw. You will need to carefully locate the screwdriver in the screw head. Its probably best if you lay the unit down on a table so that the spike points upwards. Then locate and press the screwdriver down securely before turning. Now maybe you can see the reason for replacing the sensor cover (step 4) - lots of potential to skewer an artery here.
  6. Insert a small flat head screwdriver gently into the slot that is just around the corner (5mm) from the “Salter” logo. Its at the junction of the metal and plastic. Tilt the screwdriver down a bit so that its point is aiming towards the sensor. There is a little tab in there that you have to unclip. Be careful and wiggle the screwdriver until you hear the tab click. At this point you can separate the two halves of the display. The sensor wire will pull easily out of the sensor spike.
  7. The battery is under the shiny metal cover in the display unit. Use your small philips driver again to remove this cover. Replace battery.
  8. Replace battery cover.
  9. Slip sensor wire into sensor spike.
  10. Gently clip the case halves back together.
  11. Do up the little screw that holds the case parts together.
  12. Replace silicone bits
  13. Switch on and use.
[Read More]

IBM Bladecenter H NIC Mapping

IBM Bladecenter H NIC Mapping

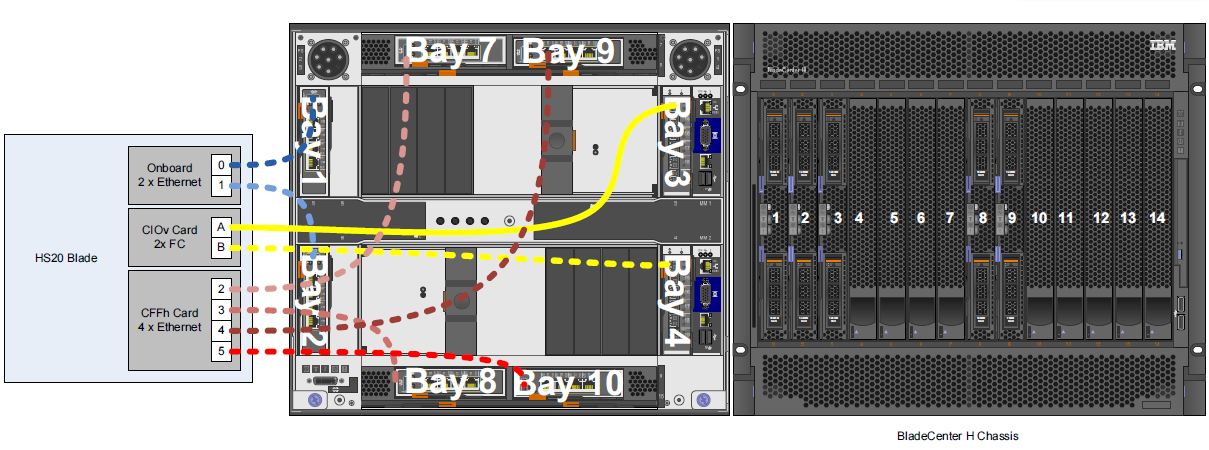
Each Blade has 2 Onboard Ethernet Connections, a CIOv Card with 2 Fibrechannel connections (44X1945) and a CFFh card with 4 Ethernet connections (44W4479).

The Bladecenter has 6 Ethernet switches (Cisco 3012 43W4395), 2 Fibrechannel modules (39Y9280) and 2 Multi-Switch Interconnect modules (39Y9314).

The Multi-switch interconnect modules are installed in the top and bottom high-speed switch bays these create bays 7 and 9 and bays 8 and 10.The Ethernet switches are installed in bays 1, 2, 7, 8, 9, 10. The fibrechannel modules are installed in bays 3 and 4.

On the Blade the NIC’s connect as follows | NIC | Switch Bay | | — | — | | First NIC | 1| | Second NIC | 2 | | Third NIC | 7 | | Forth NIC | 8 | | Fifth NIC | 9 | | Sixth NIC | 10 |

Below is a image of the connections NIC Mapping

[Read More]

Audi TT Dashpod replacement 8N2 920 930 C

Audi TT 2001 8N2 920 930 C dashpod replacement using VAGCOM

Problem

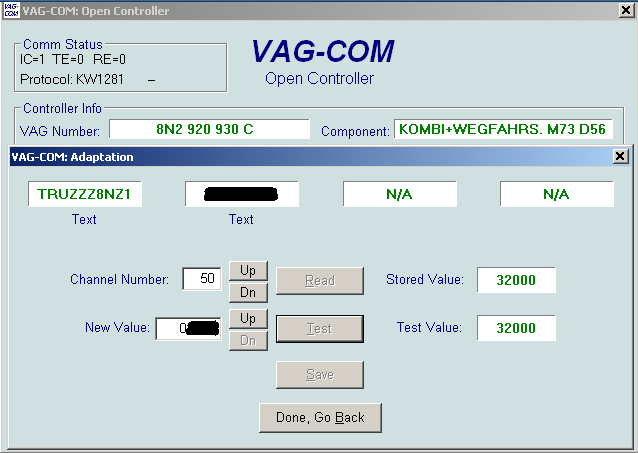
My car has Immo3 so I needed to make the dashpod copy the vin from the ecu. The issue I had with the ross-tech instruction was that the save button was ghosted out in the adaption 50

Screenshot 1

Instructions

Heres what I did, well as much as I can remember as was getting annoyed with it.

First my cluster was showing as a new/replacement cluster not adapted. This info is found by xxxxxxxxxxxxx in the extra info and measuring blocks 023. In the third column (Immobiliser status) it should display 4 (New or replacement part cluster, not matched/ adapted), if not it’ll be one of the following

Value Status
4 New or replacement part cluster, not matched/ adapted
5 Customer service locked, Adaptation data programmed
6 Immobilizer adapted, normal operating condition
7 Key adaptation in progress via scan-tool

Procedure

  1. Make sure battery is 12.5V
  2. Open vagcom and goto 17 - Instruments
  3. login with the pin for the new cluster
  4. Adaption 0, test, save, ok, close controller
  5. 01- Engine, login with pin for old cluster
  6. Adaption 0, test, save, ok, close controller
  7. Turn ignition off, remove key wait a few seconds and turn back on (don’t start)
    • I may have gone 01- engine, login with old cluster pin and close controller !!! 17 - Instruments,
  8. I may have logged in using the new pin before the next step !!! Adaption 50, read the top box should display pin?
  9. In the new value box type in the 0 and then 4 digit pin. e.g. if your pin is 1234 then type 01234 with the cursor still in the box press enter
  10. Your VIN should appear split across the top boxes
  11. the save box will be ghosted out press 0 then type the new cluster pin in the box. e.g. new pin 9876 then type 09876 and press enter
  12. Your vin should still be in the boxes above
  13. In the new value box type 32000 and then enter
  14. Now the save button should be enabled, click save, ok, close controller
  15. re-open 17- instruments, your vin should now be in the extra info box.
  16. Login using your old pin (this is now your clusters pin, as the data in the cluster has been re-written with the old immo data.
  17. now you can match the keys to the immo
  18. Once I matched the Cluster the key matching worked prefectly, now the car is running fine.

I hope this helps others, I used a vagcom dumb cable while doing this to my 2001 225.

[Read More]

OBD Python

Python OBD

Here’s some OBD Python stuff I’ve found Need python-serial for RPi

sudo apt-get install python-serial -y
sudo git clone https://github.com/AustinMurphy/OBD2-Scantool.git

Or my fork

sudo git clone https://github.com/matt2005/OBD2-Scantool.git
[Read More]

Vagcom on Linux

Download vagcom 311.2

Installation

  1. Install wine

     sudo apt-get install win
    
  2. Setup wine

     winecft
    
  3. Click ok on wine popup with no changes to any configs
  4. copy installation file to ~/.wine/drive_c/

     cp ~/Desktop/VAGCOM/Release3112n.exe ~/.wine/drive_c/
    
  5. run installation

     wine c:\Release3112n2.exe
    
  6. Follow installation through ACCEPT, install…..
  7. run shortcut on desktop
    • if not created create using

         env WINEPREFIX="~/.wine" wine "C:\Program Files\VAG-COM\VagCom.exe"
      

Setup the dongle

  1. Symlink usb

    ln -s /dev/ttyUSB0 ~/.wine/dosdevices/com1
    
  2. Select vagcom to use com1 and go test

[Read More]

VMware ESX Imagebuilder

HP Esxi Imagebuilder

Here are some instructions to build a esxi image using imagebuilder

Instructions

  1. Install VMware PowerCli
  2. Run the following in an elevated powershell prompt
# Add ESXi 5 Base Software Depot
Add-EsxSoftwareDepot -DepotUrl C:\Install\ESXi\ESXi500-201111001.zip
# Add ESXi 5 update 01 Software Depot
Add-EsxSoftwareDepot -DepotUrl C:\Install\ESXi\update-from-esxi5.0-5.0_update01.zip
# Add HP's Online Depot to get access to all of HP's Software Packages
Add-EsxSoftwareDepot http://vibsdepot.hp.com/index.xml
# Add HP Bundle
Add-EsxSoftwareDepot -DepotUrl C:\Install\ESXi\hp-esxi5.0uX-bundle-1.1.2-4.zip
# Add HP Smart Array
Add-EsxSoftwareDepot -DepotUrl C:\Install\ESXi\hpsa-500-5.0.0-offline_bundle-537239.zip
# Vars used to set the ESXi image profile name, basically just a time stamped name
$DATESTAMP=get-date -Format yyy.M.d
$PROFILEAME="ESXi5U1-HP_$DATESTAMP"
# Sort the image profiles from VMware's online depot to get the latest image profile
$ImageProfiles = Get-EsxImageProfile | Where-Object {$_.name -like "*standard*"} | Sort-Object "ModifiedTime" -Descending
# Create a copy of the latest image profile from VMware's online depot
IF ($ImageProfile -gt "1"){New-EsxImageProfile -CloneProfile $imageprofiles[0] -name $PROFILEAME}
IF ($ImageProfile -le "1"){New-EsxImageProfile -CloneProfile $imageprofiles -name $PROFILEAME}

# Add the HP related packages to the our new image profile
Get-EsxSoftwarePackage -vendor "Hewlett-Packard" | Add-EsxSoftwarePackage -ImageProfile $PROFILEAME
Get-EsxSoftwarePackage -vendor "hp" | Add-EsxSoftwarePackage -ImageProfile $PROFILEAME
# Add qlogic driver
Add-EsxSoftwareDepot -DepotUrl C:\Install\ESXi\qla2xxx-911.k1.1-offline_bundle-531155.zip
Add-EsxSoftwarePackage -ImageProfile $PROFILEAME -SoftwarePackage "scsi-qla2xxx 911.k1.1-19vmw.500.0.0.472560"
# Add Broadcom driver
Add-EsxSoftwareDepot -DepotUrl C:\Install\ESXi\tg3-3.120h.v50.2-offline_bundle-547149.zip
Add-EsxSoftwarePackage -ImageProfile $PROFILEAME -SoftwarePackage net-tg3
# Export the image profile to a bundle file
Export-EsxImageProfile -ImageProfile $PROFILEAME -ExportToBundle -FilePath C:\Install\ESXi\$PROFILEAME.zip
# Export the image profile to an ISO image
Export-EsxImageProfile -ImageProfile $PROFILEAME -ExportToISO -FilePath C:\Install\ESXi\$PROFILEAME.iso</div>

Extra Notes

HP Online Depot

Add-EsxSoftwareDepot -DepotUrl http://vibsdepot.hp.com/index.xml
[Read More]

My Raspberry PI Setup

apt-get update
apt-get upgrade
apt-get dist-upgrade
apt-get install git-core wget ca-certificates binutils -y
wget http://goo.gl/1BOfJ -O /usr/bin/rpi-update &amp;&amp; chmod +x /usr/bin/rpi-update
rpi-update 
nano /boot/config.txt

Add the following in to the file for 128MB GPU if 256MB Pi or 256MB GPU for 512MB Pi

gpu_mem_256=128
gpu_mem_512=256
echo "CONF_SWAPSIZE=1024" &gt; /etc/dphys-swapfile
dphys-swapfile setup
dphys-swapfile swapon
apt-get install preload -y
apt-get autoremove
sed -i 's/vm.swappiness=1/vm.swappiness=10/g'  /etc/sysctl.conf
sed -i 's/vm.min_free_kbytes = 8192/vm.min_free_kbytes=32768/g'  /etc/sysctl.conf
sed -i 's/sortstrategy = 3/sortstrategy = 0/g'  /etc/preload.conf
apt-get install tightvncserver -y
vncserver :1 -geometry 1024x600 -depth 16 -pixelformat rgb565
nano /etc/profile

———-add startx to end of file

crontab -e

———-add following line

@reboot su -c "vncserver :1 -geometry 1024x600 -depth 16 -pixelformat rgb565" pi
wget https://github.com/rg3/youtube-dl/raw/2012.02.27/youtube-dl
chmod +x youtube-dl
cp youtube-dl /usr/bin/youtube-dl
sudo apt-get install python-setuptools -y
wget http://pypi.python.org/packages/source/w/whitey/whitey-0.1.tar.gz
tar -zxvf whitey-0.1.tar.gz
nano ./whitey-0.1/src/yt/__init__.py

————–edit ‘mplayer and switches to omxplayer

cd whitey-0.1/
sudo python setup.py install
sed -i 's/PLAYER_CORE_DVDPLAYER/PLAYER_CORE_AUTO'
sudo git clone git://git.infradead.org/get_iplayer.git
cd get_iplayer
sudo chmod 777 get_iplayer
sudo apt-get install libwww-perl rtmpdump flvstreamer ffmpeg -y
#create /usr/bin.get_iplayer
sudo mkdir /usr/bin/get_iplayer
#copy to /usr/bin/get_iplayer
sudo cp -Rv * /usr/bin/get_iplayer/
# set default type to tv &amp; radio
/usr/bin/get_iplayer/get_iplayer --prefs-add --type=tv,radio
# set cache expiry to 1 hour
/usr/bin/get_iplayer/get_iplayer --add-prefs --expiry=3600
# set output directory
/usr/bin/get_iplayer/get_iplayer --prefs-add --output="/media/iplayer"
# set specific output directory for radio
/usr/bin/get_iplayer/get_iplayer --prefs-add --outputradio="/media/iplayer/radio"
# you can also set specific output directory for tv with
/usr/bin/get_iplayer/get_iplayer --prefs-add --outputtv="/media/iplayer/tv"
# set to use sub-directories
/usr/bin/get_iplayer/get_iplayer --prefs-add --subdir
# set file name format
/usr/bin/get_iplayer/get_iplayer --prefs-add --file-prefix="---"
# set to search future schedule
/usr/bin/get_iplayer/get_iplayer --add-prefs --refresh-future
# set to exclude cbebbies and cbbc from refresh
/usr/bin/get_iplayer/get_iplayer --add-prefs --refresh-exclude="cbeebies,cbbc,CBBC"
# set to download thumbnail
/usr/bin/get_iplayer/get_iplayer --add-prefs --thumbnail
# set to download metadata
/usr/bin/get_iplayer/get_iplayer --add-prefs --metadata=generic
# symlink for get_iplayer
cd /usr/bin
ln -s /usr/bin/get_iplayer/get_iplayer iplayer
# create cron.4hourly
mkdir /etc/cron.4hourly
chmod 755 /etc/cron.4hourly

—————–/etc/cron.4hourly/iplayer_pvr—————

#!/bin/sh
/usr/bin/get_iplayer/get_iplayer --pvr

chmod 755 /etc/cron.4hourly/iplayer_pvr

—————–/etc/cron.daily/iplayer_refresh_feeds——-

#!/bin/sh
/usr/bin/get_iplayer/get_iplayer --type=tv,radio --refresh-future --refresh

chmod 755 /etc/cron.daily/iplayer_refresh_feeds

—————–/etc/cron.daily/iplayer_update_metadata—–

#!/bin/sh
/usr/bin/get_iplayer/get_iplayer  --thumbnail-only --history
/usr/bin/get_iplayer/get_iplayer --metadata-only --metadata=generic --history

chmod 755 /etc/cron.daily/iplayer_update_metadata
# create cron.nightly
mkdir /etc/cron.nightly
chmod 755 /etc/cron.nightly

—————–/etc/cron.nightly/iplayer_cleanup_partial_downloads——-

#!/bin/sh
find /media/iplayer/tv -name *.partial.mp4.flv -exec rm -v {} \;

chmod 755 /etc/cron.nightly/iplayer_cleanup_partial_downloads

add the following to /etc/crontab ———————————–

40 0,4,8,10,14,18,22 * * * root test -x /usr/sbin/anacron || ( cd / &amp;&amp; run-parts --report /etc/cron.4hourly )

apt-get install libpcre3 -y
apt-get purge omxplayer -y
wget http://omxplayer.sconde.net/builds/omxplayer_0.2.1~git20120812~231c08b4_armhf.deb
dpkg -i omxplayer_0.2.1~git20120812~231c08b4_armhf.deb
apt-get install minidlna -y
apt-get install ntfs-3g -y
blkid
mkdir -p /media/HardDrive
chmod 755 /media/HardDrive
nano /etc/fstab
nano /etc/minidlna.conf

—-Add

media_dir=/media
# Change db_dir so that the database is saved across reboots
db_dir=/var/lib/minidlna
# Uncomment log_dir for now in case we hit problems
log_dir=/var/log

cupdate-rc.d minidlna defaults
service minidlna start

if you need to edit minidlna.conf after saving run

service minidlna force-reload

to test 4hourly run

run-parts --verbose /etc/cron.4hourly
[Read More]

Clear bad sector count on NTFS drive

Here’s my first post.

Problem

I’ve recent PV’d a failing server to VMware, however the old server had a 250GB disk but only was using 10GB of it.

VMware converter wouldn’t let me re-size the disk so I ended up just doing a full copy, now the disk is a thin disk but is taking up 250GB.

The server only needs a 40GB disk so I tried to shrink it with gparted but I was getting an error about bad sectors, as per the warning message I ran chkdsk /r /f several times but all was ok, however gparted wouldn’t run.

I know I could have used ntfsresize -bad-sectors, but I know the disk doesn’t have bad sectors.

This made m start thinking if I could reset the bad sector count on the partition, I’ve written how I did this below.

Instructions

The instructions below assume the NTFS partition is on /dev/sda1

  1. Make sure you have a full backup before proceeding

  2. Download gparted live cd

  3. When the cd has booted click on terminal type:

     ntfsinfo -i 8 /dev/sda1
    
  4. The command will output similar to the below screenshot Screenshot 1

  5. Make a note of the Allocated size for the ‘$Bad’ attribute, as indicated by the red line above type:

     ntfstruncate /dev/sda1 8 0x80 '$Bad' 0
    
  6. In the next command you will need to use the allocated size from the previous step type:

     ntfstruncate /dev/sda1 8 0x80 '$Bad' <value from previous step>
     ntfstruncate /dev/sda1 8 0x80 '$Bad' 250048479232
    

    Screenshot Screenshot 2

  7. You can now size the partition with gparted

I hope others find this useful.

Matt

[Read More]